Ads By Blogger

Tuesday, October 25, 2016

Easily create A profesional website by blogger(part-1)how to create blog


(bd tips tech)welcome to true online tips.i will share how to craete a professional website by a series post.hope all you enjoy it and stay with us at the last.frist you need a gmail account to open
blogger.if you have a gmail account allrady log in it  otherswise create an account from  here http://www.gmail.com .then go http://www.blogger.com  and log in with your gmail.now you will see bellow picture.
how to create blog
how to create blog-1
Now click  new blog.you will just bellow picture
how to create blog
how to create blog-2

Here your blog title box ’write your blog title’ and your blog addrese ‘write your blog addrese’ such as trueonlinetips.now chose a template from bellow(you can change after)and click create blog.welcome you have created your frirst blog.
Now write you website addrese in browser url bar and hit enter you will see your website.        


 Blogger primary dashboard

Overview = here you wiil see your blogger short current stat such as how many pageviews todauy,howmany comment etc.
Post = all your posts you'll see here.
Pages = all pages of your blog will see here.
Comment = Here you will find all comment of your blog.

Google + = This allows you to connect your blog with Google Plus.

Stats = The current status of your blog, where visitors are coming from so you can learn,which country visitor are coming your blog.

Earing = here you can apply for google adsense.your earning stats here.if you don,t have google adsense account or  your blog  rejected by google adsnse you can try this full earning tutorial by showing ad on your blog or website

campaigns = This will of course have to pay.

layout:you can add or gadget  from here.
Templet =template is most important for bloggrer design .here you can customize your template and you can make a professional website by blogger.keep eye our bloog.
Settings = here you can add or remove author.you can add custome domain here.
I have describe  about blogger dashboard .hope that all you are enjoy it.plaese leave a comment and share this post if find usefull.thank you.

keyword:

কিভাবে ব্লগ খুলতে হয়,কিভাবে ওয়েবসাইট খুলতে হয়,কিভাবে ব্লগার একাউন্ট খুলতে হয়,কিভাবে ব্লগ দিয়ে ওয়েবসাইট খুলতে হয়,ব্লগের খুটিনাটি,how to create a blogger,how to open a blogger website,how a open professional blog,how to open website,blogger dashboard introduction,how to create blog
Read More »
ads

Easily create a professional website by blogger(part-4)add your blog related post widget with thumbnail

Welcome to 4th part of Easily create a professional website by blogger.do you know what is related post.when a vijitor vijit your website they 
will see related post bellow end of post.its increase your website pageview and vijitor stay your blog long time.
 
add your blog related  post widget with thumbnail
how do add related post widget on blogger:
fristly login in your blog and then go template.backup your template and click edit html.now searce </head> by pressing ctrl+f
now paste bellow code just above </head> it

<!--Related Posts with thumbnails Scripts and Styles Start-->

<b:if cond='data:blog.pageType == &quot;item&quot;'>

<style type='text/css'>

#related-posts{float:left;width:auto;}

#related-posts a{border-right: 1px dotted #eaeaea;}

#related-posts a:hover{background: #EEEEEE;}

#related-posts h2{margin-top: 10px;background:none;font:18px Oswald;padding:3px;color:#999999; text-transform:uppercase;}

#related-posts .related_img {margin:5px;border:2px solid #f2f2f2;object-fit: cover;width:110px;height:100px;transition:all 300ms ease-in-out;-webkit-transition:all 300ms ease-in-out;-moz-transition:all 300ms ease-in-out;-o-transition:all 300ms ease-in-out;-ms-transition:all 300ms ease-in-out;-webkit-border-radius: 5px;  -moz-border-radius: 5px; border-radius: 5px; }

#related-title {color:#666;text-align:center;padding: 0px 5px 10px;font-size:12px;width:110px; height: 40px;}

#related-posts .related_img:hover{border:2px solid #E8E8E8;opacity:.7;filter:alpha(opacity=70);-moz-opacity:.7;-khtml-opacity:.7}</style>

<script type='text/javascript' src='http://helplogger.googlecode.com/svn/trunk/relatedposts.js' />

</b:if>


<!--Related Posts with thumbnails Scripts and Styles End-->


Customization:if you want change image height 100px as your wish  এবং for width change 110px

Now searce <div class='post-footer'>  it you can find many time.you should try the second
Now paste the bellow code.just above <div class='post-footer'>

<!-- Related Posts with Thumbnails Code Start-->

<b:if cond='data:blog.pageType == &quot;item&quot;'>

<div id='related-posts'>

<b:loop values='data:post.labels' var='label'>

<b:if cond='data:label.isLast != &quot;true&quot;'>

</b:if>

<script expr:src='&quot;/feeds/posts/default/-/&quot; + data:label.name + &quot;?alt=json-in-script&amp;callback=related_results_labels_thumbs&amp;max-results=5&quot;' type='text/javascript'/></b:loop>

<script type='text/javascript'>

var currentposturl=&quot;<data:post.url/>&quot;;

var maxresults=5;

var relatedpoststitle=&quot;<b>Related Posts:</b>&quot;;

removeRelatedDuplicates_thumbs();

printRelatedLabels_thumbs();

</script>

</div><div class='clear'/><div style="font-size: 9px;float: right; margin: 5px;"><a  style="font-size: 9px; text-decoration: none;" href="http://bdtipstech.blogspot.com/2016/01/create-website-part-4.html" rel="dofollow" >Related Posts Widget</a></div>

</b:if>

<!-- Related Posts with Thumbnails Code End-->

customization: if you want change number of related post showing bellow post you can change max-results=5and  maxresults=5 as you wish.
Hope,all you relize how to add related post on blogger.please don,t forget share and leave a Comment if think it,s realy helplfull.thanks.

keyword:

ব্লগে যুক্ত স্টাইলিশ রিলেটেড পোস্ট উইগেট,কিভাবে ব্লগে রিলেটেড পোস্ট যুক্ত করবেন,ব্লগে যুক্ত করুন আকর্ষনীয় রিলেটেড পোস্ট উইগেট,খুব সহজে ব্লগে যুক্ত করুন করুন ছবি  সহ রিলেটেড পোস্ট,how wonderfull related post blogger,add related post widget  with thumbnail,how to add related post widget to blogger, add your blog related post widget with thumbnail
Read More »

Popads earn 3times more than popcash

Welcome to bd tipstech.hope all you going good day.many days later posting on my blogger
site.today i will share how do earn more money from popads.you might have  use popcash but you don,t know that you can earn more by popads.because popads give highest cpm than popcash.

keyword:how to earn from popads,how to setup popads to blogger,how to earn from blogger,how to earn huge money from popads,কিভাবে পপক্যাশ থেকে টাকা ইনকাম করবেন,কিভাবে ব্লগে পপক্যাশ এড বসাবেন,কিভাবে ব্লগ থেকে ইনকাম করবেন

you can try for some day setting up popads on your site.some new user would not try popads becasue its set up your blog a little complex.however i will share easy way to set up on your blog.

frist go to popads.net and signup with appropiate information.

Popads earn 3times more from popcash
now check your mail and verify on clicking on link.now go back on popads and log in your account.now click on add new website.now fill the from with appropiate information and click  submit.

earn from popcash

don,t forget to mark  if your website is adult site.now popads will review your site, don,t think your site will approve withen 1 day.if your site if approved you will get a confrimation email.now log in your popads account and click code generator from left side.you will got your popads advertising code.copy the and keep save for future use.then log in to your blog and go to template.frist keep back up your template by clicking back up template from up.now click edit html and searce </head> tag by pressing ctrl+f

If you find the avobe code.paste the popads advertising code immedetlitly before  </head>tag.Now Save The Template.Now enter your blog another browser,when you click any link in your blog you will see a popads.you earning will be start.Thank you.


Keyword:আয় করুন পপএডস থেকে,কিভাবে পপএডস থেকে আয় করবেন,ব্লগে পপএড বসিয়ে আয় করুন,ব্লগ থেকে আয় করার উপায়,ব্লগ থেকে অনেক টাকা আয় করার উপায়,how to earn from popads ,earn huge money from popads,eran showing popads,Popads earn 3times more than popcash
see this video tutoraik if you face any problem
Read More »

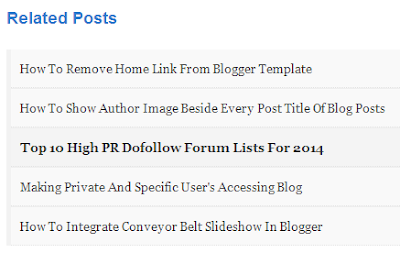
Easily create a professional website by blogger(part-5)-how to add related post widget without thumbnail

welcome to true online tips.today I will show how to add related post widget without thumbnail.it,s
most important for blog or website because it increase pageviews and decrease bounce rate.when you wiil add related  post widget without thumbnail it,s decrease loading tine and make more faster your website.
how add this:
related post widget without thumbnail
frist log in your blogger account and click template.then take backup your  template and click edit html.now searce the </head> code pressing ctrl+f
when find the code paste the bellow code just above  </head>  tag

<b:if cond='data:blog.pageType == &quot;item&quot;'><style type='text/css'>
#related-posts {
    margin: 10px 5px;
padding:5px 5px;
}
#related-posts h2 {
    font-size: 18px;
    color: black;
    margin-bottom: 15px;
}
#related-posts a {
    font-size: 14px;
    color: #999;
    text-transform: capitalize;
}
#related-posts a:hover {
    text-decoration: underline;
    color: #555;
}
#related-posts ul {
    list-style-type: none;
    margin: 0 0 0px 0;
    padding: 5px;
}
#related-posts ul {
    list-style-type: none;
    background: #e9e9e9;
    border-left: 6px solid #e2e2e2;
}
#related-posts li {
    padding: 12px;
     border-bottom: 2px dotted #E2E2E2;
}
#related-posts li:hover {
    background: #F4F4F4;
font-weight:bold;
}
</style>
<script type='text/javascript'>
var relatedpoststitle=&quot;Related Posts&quot;;
</script>
<script src='http://helplogger.googlecode.com/svn/trunk/related_posts.js' type='text/javascript'/>
</b:if>


Customization: font-size: 18px 18px here you can give as your wish font size. color: black black here you can give as your wish colour। now searce <div class='post-footer'>  you can find this code more time.you should try the second…

<b:if cond='data:blog.pageType == &quot;item&quot;'><div id='related-posts'> <b:loop values='data:post.labels' var='label'> <b:if cond='data:label.isLast != &quot;true&quot;'> </b:if> <b:if cond='data:blog.pageType == &quot;item&quot;'> <script expr:src='&quot;/feeds/posts/default/-/&quot; + data:label.name + &quot;?alt=json-in-script&amp;callback=related_results_labels&amp;max-results=6&quot;' type='text/javascript'/></b:if></b:loop>
<script type='text/javascript'> var maxresults=6; removeRelatedDuplicates(); printRelatedLabels(&quot;<data:post.url/>&quot;); </script><a style="font-size: 10px; color: #bcbcbc; float: right;" href="http://bdtipstech.blogspot.com/2016/02/create-website-related-post-part-5.html" rel="dofollow" >Get Related Post widget</a></div></b:if>   

customization: varmaxresults=6  here you can add as your wish number you want to show.
Hope all you relize how to add related post widget without thumbnail.don,t forget share and comment.thank you.

Read More »

Monday, October 24, 2016

Easily create a professional by blogger(part-3)add a beautifull control panel on blogger

Welcome to third part of Easily create a professional by blogger.toady I will show how to add a beautiful control panel on  blogger.genearlly there are no
contral panel on blogger but you can add it manually.
A control panel  for your blog Beautiful.only you will see this control panel when you logged in.without blogger admin nobody can,t see this panel.after added it you blog will look see bellow …..
 
add a beautifull control panel on  blogger
add a beautifull control panel on  blogger

How do add this panel:
at frist log in your blogger.then go template and take backup your template.now click edit html ..

now find this code <body expr:class='&quot;loading&quot; + data:blog.mobileClass'> by pressing ctrl+f
if doesn,t find out this code you can try <body >
now paste below code just after above the one any code

<span class='item-control blog-admin'>
<style>
.control-panel ul{z-index: 20; position: absolute; margin: 0px auto; background-color: #F6F6F6; width: 100%; }
.control-panel ul li{display: inline-block; float: left; padding: 7px 0px;}
.control-panel ul li a {color:#686868;padding: 7px 15px;border-right: 1px solid #E3E3E3;font-weight: bold;font-size: 13px;}
.control-panel a:hover {text-decoration:none; color:#FC8F44;}
</style>
<div class='control-panel'>
<ul>
<li><a href='http://www.blogger.com/home'>My Blogs</a></li>
<li><a href='http://www.blogger.com/blogger.g?blogID=XXXXXXXXXXXXX#editor/src=sidebar'>New Post</a></li>
<li><a href='http://www.blogger.com/blogger.g?blogID=XXXXXXXXXXXXX#editor/target=page'>New Page</a></li>
<li><a href='http://www.blogger.com/blogger.g?blogID=XXXXXXXXXXXXX#posts'>All Posts</a></li>
<li><a href='http://www.blogger.com/blogger.g?blogID=XXXXXXXXXXXXX#comments'>Comments</a></li>
<li><a href='http://www.blogger.com/blogger.g?blogID=XXXXXXXXXXXXX#pageelements'>Layout</a></li>
<li><a href='http://www.blogger.com/blogger.g?blogID=XXXXXXXXXXXXX#templatehtml'>Edit HTML</a></li>
<li><a href='#' onclick='location.reload(true); return false;'>Refresh</a></li>
<li><a href='/' target='_blank'>New Tab</a></li>
<li><a href='http://www.blogger.com/blogger.g?blogID=XXXXXXXXXXXXX#basicsettings'>Settings</a></li>
<li><a href='http://www.blogger.com/blogger.g?blogID=XXXXXXXXXXXXX#overviewstats'>Stats</a></li>
<li><a href='http://www.blogger.com/logout.g'>Logout</a></li>
</ul>
</div>
</span>


Here XXXXXXXXXXXXX  replace with your blogger id.where you will find blogger id.enter you blog click address bar.you will see  BlogID=XXXXXXXXXXXXXXXXXXits your blogger id.hope all enjoy this post.thnaks.
Read More »

Tuesday, January 12, 2016

আপণার ব্লগে যোগ করুন feature post widget

(bd tips tech)এ আপনাদের স্বাগতম আশাকরি সবাই ভাল আছেন।আজ আপনাদের সাথে একটি ব্লগার টিপ্স শেয়ার করবো।আজ আমি দেখাবো কিভাব এয়াপ্নার ব্লগে ফিচার পেউইজ উইগেট যুক্ত করবেন।আশাকরি  ফিচার পোস্ট সমন্ধ্যে সবাই জানেন।আপনি যদি নিদির্ষ্ট কইয়েকটী পোস্টকে হাইলাইট করতে চান তাহ্লে ফিচার পোস্ট উইগেট খুবই কার্যকরি ।ডেমো দেখতে এখানে ক্লিক করুন।কিভাবে ব্লগে ফিচার পোস্ট ইউগেট যুক্ত করবেন।প্রথমে ব্লগে লগইন করে LAYOUT এ চলে যান।তারপর ADD A WIDGET এ ক্লিক করুন।HTML নির্বাচন করুন।তার পর নিচের পোস্টটি কপি করে পেস্ট করে দিন। 

এটিও দেখুন ব্লগে যুক্ত করুন TOTAL POST AND COMMENT WIDGET 
 
<style>

 #featured-posts{width:100%;height:200px;background:#34495e;margin-top:-1px}#featured-posts h3{color:#fff;font-size:20px;margin:0;font-weight:300;text-align:center;padding:15px}#featured-posts ul{margin:0;padding:20px}#featured-posts ul li{list-style-type:none;padding-left:10px;float:left;margin-right:20px;width: 249.5px;height:100px;border-left:3px solid rgba(255,255,255,0.5)}#featured-posts ul li span{color:rgba(255,255,255,0.5);display:block}#featured-posts ul li span i{padding-right:8px}#featured-posts ul li a{color:#fff;text-decoration:none;font-size:15px;line-height:25px}#featured-posts ul li:hover{border-color:#3498db;margin-top:-10px;-webkit-transition:all .3s ease 0;-moz-transition:all .3s ease 0;-ms-transition:all .3s ease 0;-o-transition:all .3s ease 0;transition:all .3s ease 0}#featured-posts ul li:hover span{color:#3498db}

  #featured-posts ul li:last-child { margin-right:0;}

@media screen and (max-width : 1200px) {

    #featured-posts ul li {width: 224.5px;}

  }

@media screen and (max-width : 1100px) {

    #featured-posts ul li {width: 199.5px;}

  }

@media screen and (max-width : 1000px) {

    #featured-posts .item4 {display:none}

    #featured-posts ul li {width: 243.6px;}

    #featured-posts .item3 {margin-right:0;}

  }

@media screen and (max-width : 900px) {

    #featured-posts ul li {width: 210.3px;}

  }

@media screen and (max-width : 800px) {

    #featured-posts .item3 {display:none;}

    #featured-posts ul li {width: 282px;}

    #featured-posts .item2 {margin-right:0;}

  }

@media screen and (max-width: 700px) {

   #featured-posts ul li {width: 232px;}

  }

@media screen and (max-width: 600px){

    #featured-posts ul li {width: 182px;}

    #featured-posts {height:220px;}

  }

@media screen and (max-width : 500px){

    #featured-posts{display:none!important;}

  }

</style>

<div id='featured-posts'>

<div class='container'>

<h3>Featured Posts</h3>

<ul>

<li class='item1'><a href='YOUR POST URL'>YOUR POST TITLE</a><span><i class='fa fa-tags'/>YOUR POST SHORT DESCRIPTION</i></span></li>

<li class='item2'><a href='YOUR P0ST URLl'>YOUR POST TITLE</a><span><i class='fa fa-tags'/>YOUR POST SHORT DESCRIPTION</i></span></li>

</ul>

</div>

</div>


এখানে YOUR POST URL এর যায়গায় আপনার পোস্ট লিংক দিবেন।YOUR POST TITLE এর যাগইয়ায় আপনার পোস্টের শিরোনাম দিন এবং YOUR POST SHORT DESCRIPTION এর যাগইয়ায় পোস্টের সংক্ষিপ্ত বর্নণা দিন।

                      
ফিচার পোস্ট
    

উপরে দুইটি ফিচার পোস্টের ক্ষেত্রে দেখানো হইয়ছে কিভাবে আরো যোগ করবেন।নিচের কোডটি দেখুন item2 আছে।এখানে 2,এভাবে 3,4,5.

<li class='item2'><a href='YOUR P0ST URLl'>YOUR POST TITLE</a><span><i class='fa fa-tags'/>YOUR POST SHORT DESCRIPTION</i></span></li>


উপরের কোডটি ।এই কোডটির উপরে পোস্ট করুন

</ul>

</div>

</div>

আশাকরি বুজতে পেরেছেন।আনা বুঝতে পারলে অবশ্যই কমেণ্ট করে যানাবেন।
Read More »
copyright 2014-2023@bdtipstech DMCA.com Protection Status